
Every lead is a race against time, and effective lead routing is your best shot at winning it.
When a new lead hits your CRM, the clock starts ticking.
Whether it came from a demo request, webinar signup, or third-party list upload, that lead needs to land with the right rep — fast.
Lead routing is the process that makes that happen. It determines who gets what lead, when, and why — and it can make or break your team’s ability to follow up with speed and relevance.
But lead routing isn’t a perfect science, and what works best for one organization might not be effective for another. Finding the right strategy requires understanding your unique business needs and having the flexibility to adapt as they evolve.
Here’s what you need to know about lead routing, examples to get you started, and best practices to help you win that speed-to-lead race.
What is Lead Routing?
Lead routing, also known as lead assignment, is the process of assigning incoming leads (and prospects) to the most suitable sales representative.
A lead routing process can be as simple as listing all sales reps alphabetically and assigning each new lead to the next rep in line. If you have reps named Anna, Ben, and Carl, the first lead goes to Anna, the second to Ben, the third to Carl, and then the cycle repeats.
But most teams need far more flexibility.
Modern sales environments and customer relationship management platforms (CRMs) like Salesforce help businesses automate lead routing based on a wide range of criteria.
And while Salesforce offers native tools like Flow Builder to build out routing flows, these require complex, manual configurations that can’t keep up with complex logic.
To handle this complexity, many teams turn to APEX development or use automated lead routing platforms that combine logic-based routing, data enrichment, and availability-aware assignment.
These tools reduce human error, improve speed to lead, and make it easier to adjust routing rules as your GTM strategy evolves.
For example, when a sales-qualified lead (SQL) enters your system, automated lead routing software can instantly assign it to the next available rep who not only has capacity — but also a strong track record with that specific lead type. This gives each prospect a faster, more personalized follow-up and increases your chances of converting high-intent leads into revenue.
Key Takeaways: What is Lead Routing?
Here’s a quick breakdown of what lead routing involves and why it matters:
- Lead routing is the process of assigning each new lead to the most appropriate sales rep based on predefined rules.
- While some businesses use simple round-robin or alphabetical methods, most need more dynamic, logic-based approaches.
- Built-in lead routing tools like Salesforce Flow Builder can support basic routing but often falls short for businesses with complex or evolving criteria.
- Advanced lead routing platforms allow you to assign leads based on rep availability, territory, industry, and historical performance.
- Automating lead routing helps eliminate manual errors, reduce response time, and ensure no high-intent lead slips through the cracks.
- Smart routing increases conversion rates by matching leads to reps with the right experience, context, and bandwidth to close the deal.
10 Lead Routing Examples
Different types of lead routing cater to various business needs, such as balancing workloads, leveraging specialized knowledge, and prioritizing high-value prospects. Here are 10 popular lead routing strategies, their benefits, and examples of how to implement them.
1. Round-robin Routing
What is round-robin lead routing? It’s a lead-routing strategy that sequentially assigns incoming leads to sales reps in a rotating order, distributing leads evenly among all sales team members.
If there are five sales reps, for example, the first lead goes to Rep A, the second to Rep B, and so on until the cycle repeats.
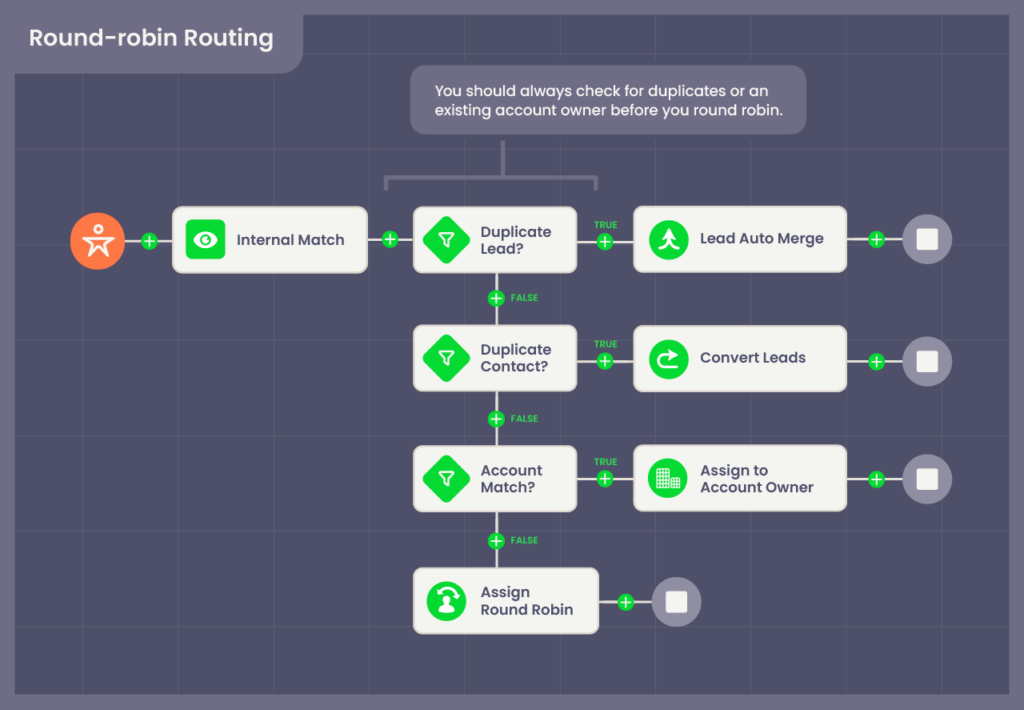
A round-robin-based routing system helps maintain a balanced workflow and ensures all reps have equal opportunities to engage with new leads.
But since this assignment happens sequentially and doesn’t consider factors like each team member’s expertise, a round robin won’t always match leads with the most suitable rep. High lead influxes can also overwhelm the sequential order and cause delayed follow-ups and missed opportunities.
2. Territory-based routing
This strategy assigns incoming leads to sales reps based on specific geographic regions. Here, each rep is responsible for leads within their designated area or territory.
If an American company has three sales reps covering the East Coast, another the West Coast, and a third the Midwest, leads from New York would go directly to the East Coast rep, Arizona to the Midwest Rep, and leads from California to the West Coast rep.
A territory-based routing system builds strong customer relationships by helping reps provide more personalized service and understand local market conditions better.
However, this process can distribute leads unfairly if certain territories generate more leads than others, overwhelming some reps while leaving others with fewer opportunities. Its rigid boundaries could also limit flexibility in reassigning leads and adapting to market changes.
3. Account-based routing
Account-based lead routing assigns incoming leads to sales reps based on specific accounts, usually focusing on key and strategic clients.
Under this strategy, each rep handles all leads and opportunities within their designated territory of accounts. This helps them cultivate deeper customer relationships and better understand their customer needs.
For example, let’s say you have a dedicated enterprise rep who owns Zoom.
When a new lead from a subsidiary like “Zoom Video Ireland” comes in — or when someone uses a personal email like kate@zoom.us — you don’t want that lead floating in a round robin or sent to the wrong segment. You want it recognized as part of the Zoom account and routed to the right rep immediately.
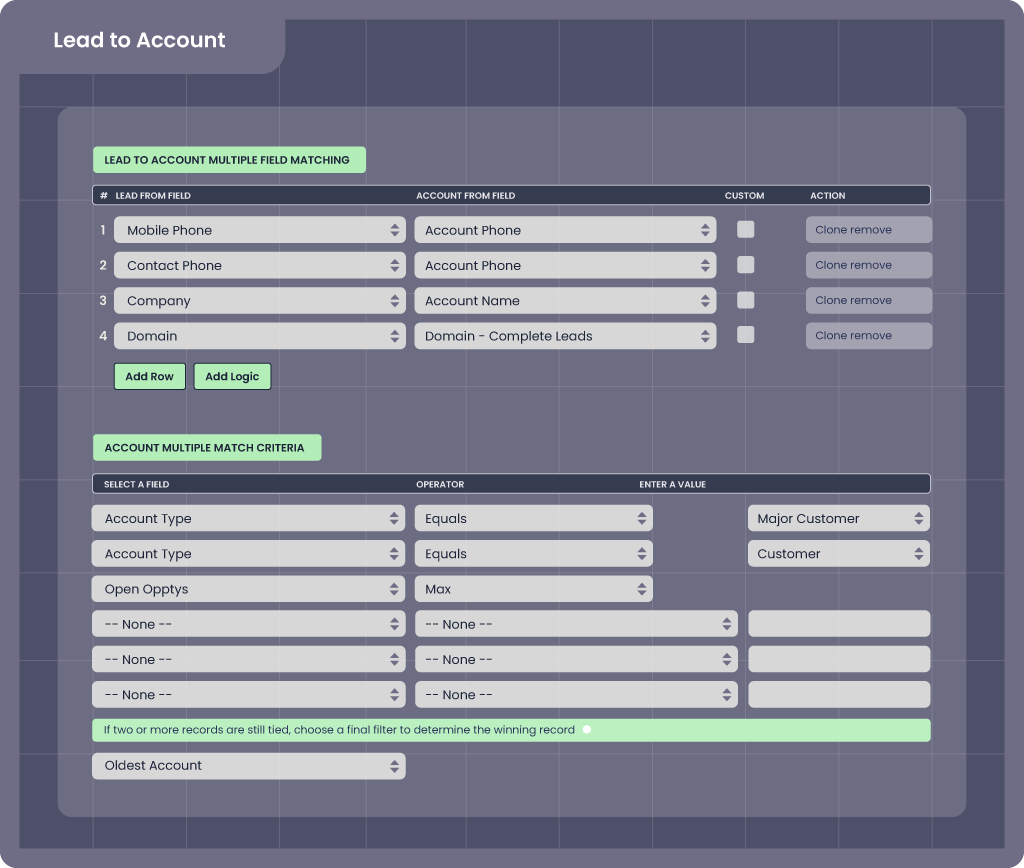
To streamline this process, teams often rely on automated lead-to-account matching.
Instead of expecting reps to manually look up account hierarchies and confirm ownership, lead routing software like Complete Leads helps automatically connect leads to the right account based on fields like email domain, company name, and even fuzzy logic for things like “Zoom Inc.” vs. “Zoom Video Communications.”
But similar to territory-based routing, account-based routing can create imbalances, such as uneven workloads, if certain accounts generate more leads than others.
One rep might be overwhelmed with hundreds of inbound leads from a single enterprise account, while others wait for theirs to trickle in.
Without a plan to monitor and rebalance workloads, this can lead to burnout, slower follow-up times, and missed SLAs, even if leads are technically routed “correctly.”
My North Star is providing an accurate book of business for our sales team. That way they’re spending less time focusing on validating the account and firmographic data in their book of business and more time on cultivating customer relationships.
Heidi Davis, Manager of Sales Operations and Global Data at Zoom
4. Hierarchy-based lead routing

Hierarchy-based lead routing matches and routes inbound leads to the owner of an account hierarchy, or family tree consisting of related child accounts or subsidiaries within a parent account.
Consider a large multinational corporation like Disney, with several account divisions, branches, and legal entities. With hierarchy-based routing, the routing system automatically matches a lead from any Disney subsidiary, like Hulu, to the parent account and routes it accordingly.
You can use native account hierarchies in Salesforce, however, this is a very manual process.
When data changes constantly, it can be impossible to keep up with and can create duplicates if accounts are not properly connected to the Parent Account field.
Other limitations include:
- Single hierarchy view. Out-of-the-box Salesforce limits you to one hierarchy per Account and doesn’t accommodate other organizational relationships such as different legal, operational, and sales structures.
- Dependence on existing accounts. All parent accounts must already be part of Salesforce to build a hierarchy. If a parent account is missing, it can lead to incomplete or fragmented hierarchies.
- Chain linking limitations. In Salesforce, you must manually link a child account directly to a parent account, and that account to a parent. This “chain linking” can create inaccurate hierarchies and misrepresented relationships if improperly managed.
To avoid the pitfalls of building hierarchies and manual hierarchy management, many teams turn to automation.
Salesforce-native hierarchy automation tools like Complete Hierarchies let you dynamically build and maintain multiple hierarchy views — legal, operational, and sales-based — without relying on manual chain-linking or pre-existing parent accounts.
And you can build routing logic that leverages these views to reflect your GTM strategy — whether that’s assigning leads by sales ownership, product line, region, or a mix of all three.
5. Contact-based routing
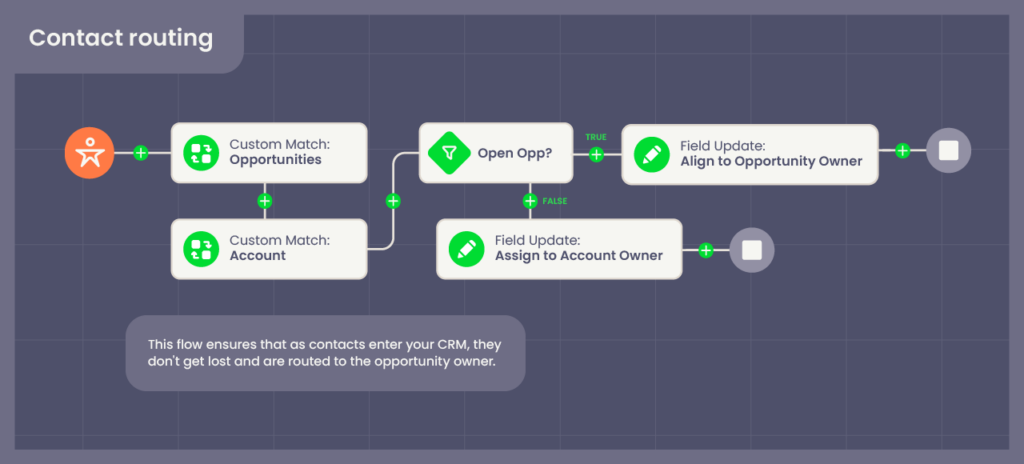
Contact routing is a unique strategy that forgoes the lead object and routes contacts instead. By routing contacts directly, you avoid cluttering your CRM with unnecessary lead records.
Let’s say you manage Sales Operations at a large SaaS company. One of your key accounts is a corporation with multiple divisions, each using different products your company offers.
When a lead comes in from a contact at the corporation’s IT department who previously engaged with your sales team about cloud solutions, you can route this new lead to the same sales rep who handled the earlier interaction.
Doing so ensures the rep who’s already familiar with the contact’s unique challenges and past conversations can continue the dialogue. The rep understands the contact’s pain points and can tailor the discussion to address them directly, increasing the chances of closing a deal.
Contact routing is also useful for cross-selling and up-selling to existing customers and tapping into whitespace opportunities.
When a contact interacts with a marketing campaign, for example, you can set their engagement to trigger a routing process that matches them to an existing account and alerts the account manager for timely follow-up.
6. Product-based routing
Product-based lead routing sends incoming leads to reps based on the specific product or solution they’re interested in. This strategy ensures that product specialists handle each lead, giving prospects a faster, more relevant experience.
Most teams use product-based routing as a secondary layer. You might first route a lead based on account ownership, then assign it to a rep based on the product mentioned in the form fill, demo request, or enrichment data.
Take Amazon, for example.
Let’s say your team supports the overall Amazon account, but different reps manage different services like AWS, Prime, and the advertising platform.
If a lead expresses interest in AWS, your routing logic should recognize the product signal and send it directly to the AWS specialist — not just a general Amazon rep. That way, the lead reaches someone who understands their needs from the start.
This approach can boost speed-to-lead and improve conversion rates, but it can also create capacity issues if certain products generate more leads than others. To prevent overload, add fallback routing that reassigns leads to other qualified reps when product specialists hit capacity.
7. Availability-based routing
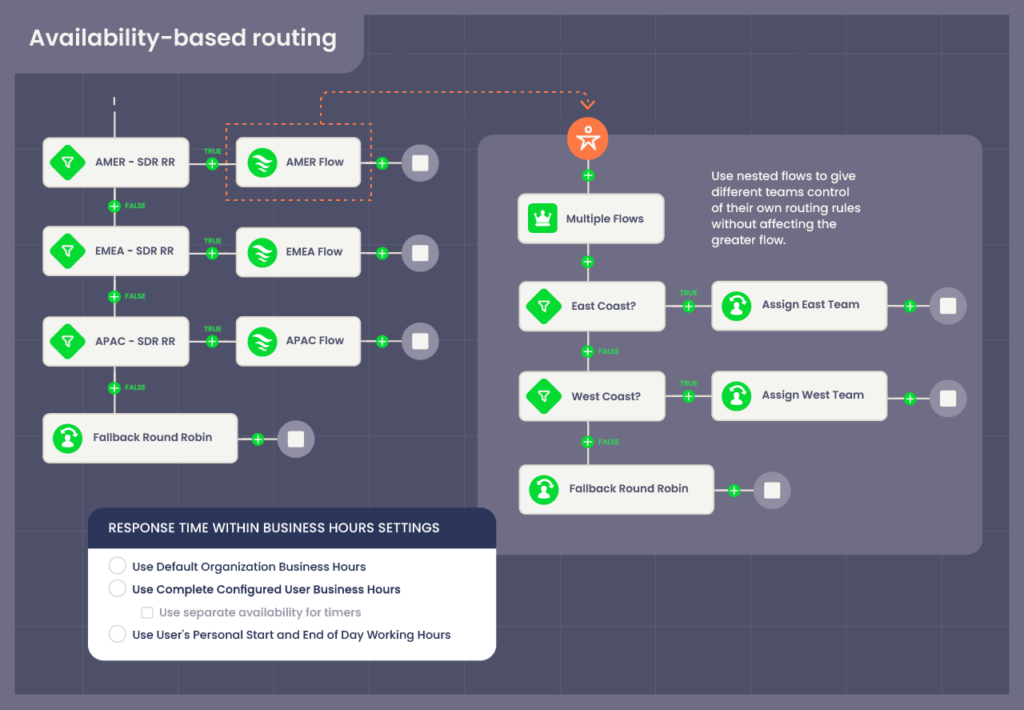
Under availability-based lead routing, you assign incoming leads to sales reps based on their current availability.
Consider a software-as-a-service (SaaS) provider like Asana. When a new lead enters the system, you or your lead routing software checks which sales rep is available to take on the lead. If Rep A is on a sales call and Rep B just finished theirs, Rep B will get the lead.
While this routing approach ensures reps respond to leads quickly, it won’t always match leads with the most qualified reps since it prioritizes availability over expertise. To maximize the effectiveness of this strategy, ensure you have clear rep availability parameters to balance workloads and maintain high response times.
Use a routing tool that integrates with Google Calendar and Salesforce Business Hours to determine whether reps are in a meeting, out of the office, or working in a different time zone. This lets you accurately assess availability and ensure you route leads to reps who can quickly respond.
Choosing a tool that lets you update automation rules in real-time, like Complete Leads, also helps keep you agile to quickly accommodate changes in your GTM strategy, like when a rep joins or leaves your team, or when someone goes on vacation.
The number one benefit about using [Complete Leads] is the fact that we’re able to route our leads automatically almost as soon as a lead gets into the system, it’s real-time routing.
Miriam Rosas Cano, Revenue Operations Analyst at Asana
8. Source-based routing
Source-based routing assigns incoming leads to reps based on the lead’s origin, such as marketing campaigns, referrals, and social media. The idea here is that if reps are familiar with the context and nuances of the lead’s source, they’re better equipped to provide more targeted and effective follow-up.
Let’s say you’re running multiple social media campaigns, partner referral programs, and webinars.
When a new lead arrives from a partner referral, you assign it to the reps who manage partnerships. But for leads originating from a webinar and those leads are passed over, they’ll get routed to a rep experienced in engaging webinar attendees.
However, this approach can create workload imbalances if certain campaigns see more engagement than others. It can also limit lead reassignment flexibility if a rep suddenly becomes unavailable or if lead sources shift significantly.
9. Trigger-based lead routing
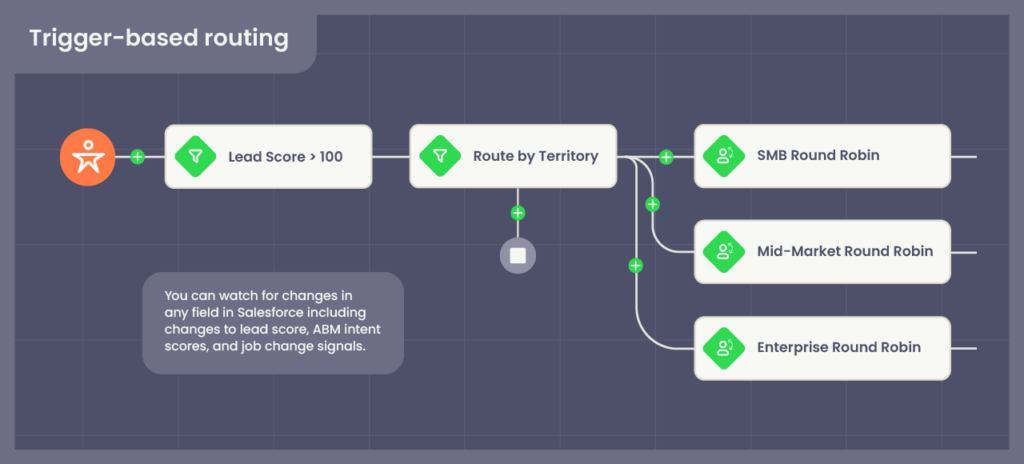
Trigger-based routing assigns leads to sales reps based on real-time actions, like visiting your pricing page, downloading a whitepaper, or attending a webinar. These behaviors signal buying intent and let you route leads based on engagement, not static criteria.
Unlike routing strategies that rely on fixed factors like geography and company size, trigger-based routing adapts dynamically. It aligns your sales team with each lead’s most recent behavior, helping you strike while interest is high.
Imagine you’re leading a Sales Operations team.
A lead views your pricing page three times in one week, watches a product demo, and downloads a case study. These actions contribute to the lead’s engagement score — a value that reflects conversion potential and acts as the trigger for routing.
Once a lead crosses a threshold, your system can automatically assign them to a rep, notify the team, and even trigger a follow-up sequence. This responsiveness helps your team prioritize the right prospects and move faster on hot deals.
Keep in mind that some behaviors — like visiting the pricing page — happen more frequently than others. If you’re routing every lead based on the same trigger, you risk overwhelming a handful of reps while others sit idle.
To avoid this, implement load-balancing rules and regularly audit your trigger thresholds to ensure even lead distribution.
10. Industry-based routing
This strategy routes incoming leads to sales reps based on the industry the lead belongs to.
At a company like IBM, for example, industry-based routing would route retail industry leads to reps who understand retail technology like point of sale (POS) systems and consumer behavior, while leads from the manufacturing sector would go to reps knowledgeable about supply chain management and manufacturing processes.
An industry-based routing system optimizes lead management by allowing reps to provide tailored solutions specific to that lead’s industry, increasing conversion chances and customer satisfaction.
Without complementary routing features, workload imbalances remain an issue here and you risk creating silos within the sales team as reps specialize in some industries and not others.
You also risk complicating onboarding for new sales reps as they need to gain deep industry-specific knowledge before they can start selling effectively. If certain industries experience downturns, reps specializing in that industry may face difficulty pivoting to other sectors, too.
Extra: Fallback routing
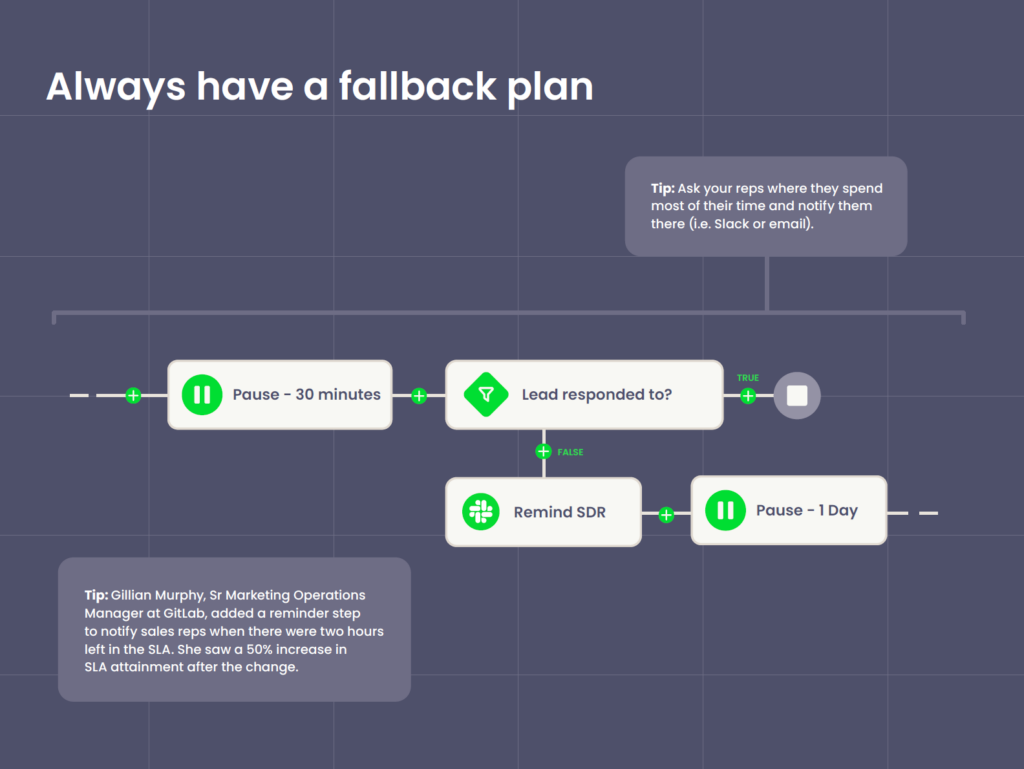
Leads can still fall through the cracks even when you have the best routing automation. Maybe a rep is out sick, tied up in back-to-back meetings, or simply misses a follow-up. Instead of tracking each rep’s SLA timer, you can set up fallback routing as a safety net.
If a rep doesn’t follow up within a defined time window — say, 2 hours — your automation engine can trigger a reminder or automatically reassign the lead to someone else.
With Complete Leads, for example, you could:
- Set a timer that alerts the assigned rep via Slack or email after 2 hours of no contact
- Escalate or reroute the lead to a backup rep after 6 hours
- Pause routing overnight and restart in the morning if working hours have ended
Lead Routing Best Practices: 5 Tips
These routing strategies are not exclusive of one another, and we recommend using whatever strategies work best with your go-to-market motions. Whether you’re using a round-robin system, a territory-based approach, or a combination of lead routing strategies, following best practices maximizes their effectiveness. Here are five tips to ensure your lead routing is as efficient and productive as possible.
1. Regularly update lead assignment rules with a visual flow builder

Lead assignment rules dictate how your lead routing system distributes leads among sales reps based on predefined criteria. You can establish your criteria based on factors such as business size, maturity, and geographic location.
In Salesforce, you can create lead routing flows through the Flow Builder. But there are limitations and it’s usually owned by an administrator which gates the ability to update routing rules yourself. This problem becomes even more cumbersome and slow as your business scales.
For instance, if you’re targeting both small businesses and large enterprises, you might create rules that assign leads from smaller businesses to a sales team specializing in SMBs and enterprise leads to a team that handles complex and high-value deals.
As your business evolves and expands into new industries, you’ll need to revisit and adjust these rules to route leads to the most appropriate sales reps.
Here’s how lead routing software like Complete Leads can simplify your lead routing process in Salesforce with a more intuitive, flexible visual flow builder:
- Quickly create, modify, and visualize routing flows. Complete Leads lets you build and adjust routing flows in seconds with a drag-and-drop interface. This helps you see the entire routing process at a glance, empowering you to identify and address any gaps and inefficiencies.
- Organize and manage routing logic with nested flows. Nested flows, or flows within flows, organize complex routing logic into manageable segments. For example, you can have a main flow for routing leads by company size with nested flows underneath for different geographic regions. This structure lets you update specific routing logic segments — such as adding a new territory — without affecting other parts of your flow.
- Trigger complex, real-time routing decisions. As a low to no-code solution, Complete Leads lets you build sophisticated routing flows without any coding. It also lets you reference data from any object in Salesforce. This flexibility means you can quickly and accurately route leads to the right reps based on up-to-the-second data, helping your team quickly respond to new opportunities.
- Add context with sticky notes. You can add notes beside your flows in Complete Leads for additional context and reminders. These notes let your team understand the reasoning behind your routing decisions and keep track of important changes, making future adjustments smoother and more transparent.
- View and manage changes with a visual history log. Complete Leads includes a visual history log that tracks all changes made to your routing flows. This lets you quickly review past adjustments, understand the routing logic’s evolution, and revert to previous changes if necessary.
2. Implement a lead-scoring system
Lead scoring assigns a value to each lead based on predefined criteria such as demographic information, engagement level, and behavioral data. This information helps sales teams to quickly identify and act on high-quality leads.
In Salesforce, you can set up a lead-scoring system by defining criteria that indicate a lead’s readiness to buy. These might include behavioral actions like downloading a guide, attending a webinar, and scrolling through your pricing page but can also include factors such as company size, a lead’s job title, and their geographic location.
Each action and criterion has a point value, and the total score indicates the lead’s overall quality and likelihood of conversion. Leads with a higher score have higher priority and get more quickly routed to a sales rep, ensuring they receive immediate attention.
Here’s how a SaaS company might define key actions in its lead-scoring system:
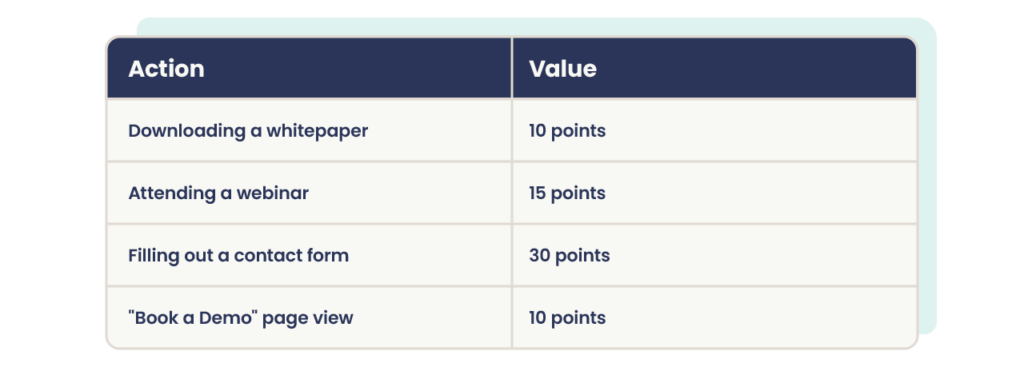
If a lead downloads a whitepaper (+10 points), attends a webinar (+15 points), and fills out a contact form (+30 points), they’ll have a total score of 55, indicating high engagement with your product and purchase intent. The lead routing system will recognize their high score and route it to a top-performing rep specializing in handling high-quality leads.
3. Monitor lead response times with a lead response timer
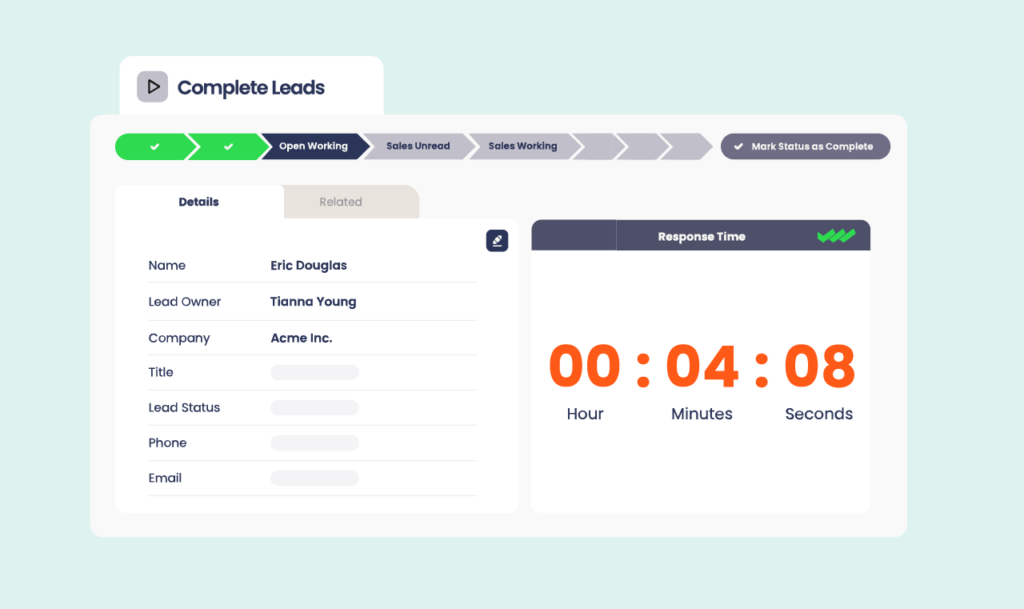
Lead response times, or how fast you engage with new leads after they enter your system, directly correlate with conversion rates. One study even suggests that engaging with leads within the first five minutes makes your conversion rates 8 times higher.
That doesn’t come as a surprise — fast responses show leads that you’re reliable, attentive, and eager to solve their pain points — all characteristics of great customer service. Immediate responses also prevent hot leads from cooling off and exploring your competition, keeping your business at the forefront of their decision-making process.
You can track response times directly on the lead record itself in Salesforce, letting you and your sales reps know how quickly the team engages leads. Here’s how:
1. Set custom fields. Create custom fields on the lead object to store the timestamps. You can add fields such as “Lead Creation Time” and “First Engagement Time” to log precisely when a lead enters your system and when a rep contacts a lead for the first time.
2. Create formula fields. Add a formula field to calculate the response time. This field subtracts the “Lead Creation Time” from the “First Contact Time” on your lead object to give you the response time directly on the record.
3. Capture timestamps. Use Salesforce workflows or the Process Builder to automatically populate the above custom fields. When the system creates a lead record or when a sales rep logs the first contact activity, your workflow can automatically set the “Lead Creation Time” to the current timestamp and capture when the first rep engagement happened, respectively.
Some tools, like Traction Complete’s Response Timer, even let you track the time between different sales cycle stages and segment response times by sales rep, lead source, accounts, and other key criteria. It’s a great analytical aid to help you identify bottlenecks in your sales process and ensure adherence to service-level agreements (SLA).
4. Enrich your lead data with multiple third-party data sources
Integrating third-party data providers like Zoominfo or Dun & Bradstreet (D&B) into Salesforce ensures you’re working with the most updated and accurate information about your leads and accounts.
These data providers offer extensive databases that include firmographic details, contact information, financial data, and other important details that can help you improve your lead qualification and assignment.
But it’s important to recognize that third-party data providers aren’t always perfect. They can sometimes deliver conflicting information, especially if you’re using multiple providers. This creates inconsistent data, such as different values for the same field (like the number of employees or industry classification), potentially causing your reps to target companies outside your ideal customer profile and waste time on unqualified leads.
To enrich your Salesforce data effectively and avoid these data quality pitfalls:
1. Integrate third-party data providers. Set up API connections that allow data to flow from third-party data providers to Salesforce. You can do this using native Salesforce connections or through third-party integration tools available on the Salesforce AppExchange.
2. Map data fields carefully. After integration, map the data fields from each third-party provider to the corresponding fields in Salesforce. Pay extra attention to fields like company size, industry, location, and contact details to ensure you correctly import the enriched data into your CRM. Be mindful of potential conflicts between data sources and establish rules for which provider’s data should take precedence in case of conflict.
3. Automate data updates with caution. After integrating your third-party data source, set up automation rules to keep your data updated. Use Salesforce’s automation tools like Flow and Process Builder to schedule regular updates from the data provider. But remember that automation isn’t a “set-and-forget” tool. Regularly review the accuracy of the data you’re importing and consider building automation that periodically validates your data sources.
4. Refine your lead routing rules. With enriched data, you can refine your lead routing rules to leverage the new, more accurate information. Instead of routing all SMB leads from New York to the East Coast SMB team, for example, you can further segment these leads based on specific needs identified through the enriched data.
5. Optimize data provider usage. If you’re managing multiple data providers, consider using one at the lead level, another at the account level, and a third for specific data subsets. Doing so helps you avoid conflicting information and ensures clarity on which provider is responsible for any changes made to your data.
6. Maintain data integrity with Picklists and Integration Users. Minimize your intake of dirty data by having users populate fields using predefined picklist values. You can also use dedicated integration users to track which vendor or provider made specific data changes, helping you maintain data accuracy and traceability across your system.
5. Use advanced automation
As your business scales, manually routing leads becomes impractical and nearly impossible due to sheer volume. It’s not just about volume either — the complexity of who should receive which lead, based on account ownership, product interest, or geography, quickly outgrows what spreadsheets or basic rules can handle.
And even when automation is introduced, it often hits a wall: manual routing controls are typically locked down by operations or admin teams.
That means sales and marketing — the teams who actually need to adapt routing rules on the fly — are stuck waiting on others to make changes, slowing everything down.
This disconnect between those who own the process and those who actually use it creates delays, bottlenecks, and missed opportunities — especially when rules and logic need to change quickly.
To keep up with evolving GTM strategies and lead volumes, teams need more than just basic RevOps automation. They need flexible, advanced routing systems that adapt to complexity without adding friction.
With advanced lead routing software like Complete Leads, you can fully automate your lead routing process:
- Automate complex routing flows. Complete Leads empowers you to create sophisticated flows that automate lead assignments based on specific criteria such as lead scores, changes in intent data, and account activity. These automated flows route flows to the appropriate rep instantly, minimizing delays and improving your speed-to-lead.
- Reference and route any Salesforce Object. With Complete Leads, you can reference data from any object in Salesforce. This lets you create highly customized and precise routing rules, like referencing data from the Opportunities object to check whether a lead’s associated account has any open deals. If an open opportunity exists, you can automatically route the lead to the best available rep.
- Automatically send notifications and follow-ups. Automated notifications let your reps know when they get new leads. This ensures your team is always on top of new opportunities, minimizing the risk of missed leads.
- Handle high processing volumes. Too much complex automation can make deployment feel like a traffic jam, causing slowdowns and APEX CPU Time Limit Exceeded errors. With Complete Leads, you can efficiently manage high volumes by detecting and performing operations in batches, which keeps your automations running smoothly and without interruption, even at scale.
- Prep your routing system for agentic systems like Agentforce. Use Complete Leads to match leads to accounts, standardize key fields, and deduplicate records at entry. This ensures AI systems like Agentforce can work from clean, connected data when surfacing insights or recommendations.
The Challenges of Lead Routing at Scale
As your GTM operations scale up, establishing and updating routing rules get more difficult.
No matter what routing strategy you use, you’ll likely have conditional routing logic that considers multiple criteria such as lead source, geographic location, and behavior — especially when you’re expanding into new territories and industries.
If you’re in a situation where you need to assign leads based on real-time data or changing business rules, you’ll also need custom APEX code to handle the extra logic.
Maybe your company launches a new marketing campaign that drastically increases lead volume, requiring more sophisticated routing to manage the influx. Perhaps you want to segment your customer base more granularly and you need custom coding to handle the more detailed routing criteria. Or new regulatory requirements introduce stricter data handling and compliance rules.
Remember that statistic on how engaging with leads within the first five minutes makes your conversion rates 8 times higher?
It’s difficult to reach that milestone when you need to revamp your routing logic whenever there are big business changes.
The key takeaway is that you need an automated routing system that adapts quickly without custom code, extensive manual configuration, or involving Salesforce Admins.
How Traction Complete Can Help
Complete Leads by Traction Complete is an automated lead routing solution that’s 100% Salesforce.
Unlike Salesforce Flows, which often require admin support or developer involvement to update, Complete Leads empowers your team to manage and modify routing logic directly — no deployments, no delays. Its drag-and-drop interface makes it easy to visualize complex flows and adjust them in real time as your GTM strategy evolves.
To give you an example, here’s what a typical round-robin flow looks like in Salesforce Flow Builder:
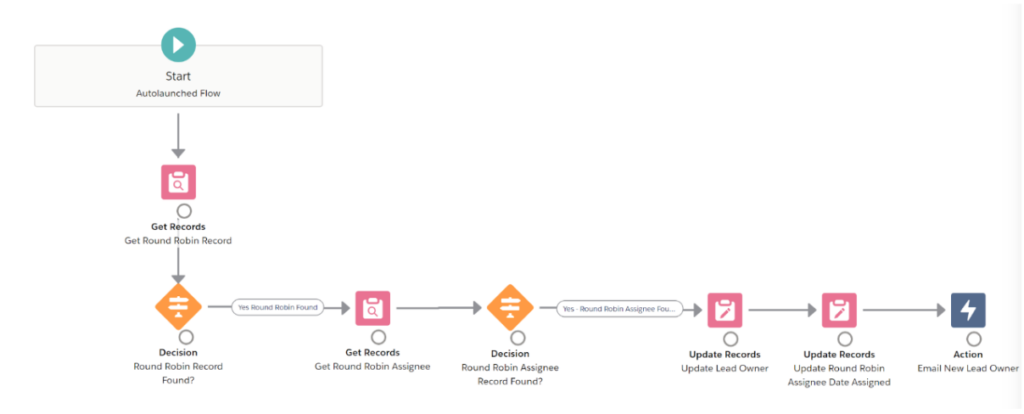
This flow has seven steps, and expanding it by even one more step introduces multiple new decision points, data manipulations, and potential action branches.
If you want to verify the lead’s validity before assigning it, you’ll need a new decision element, additional record retrievals, and conditional updates.
Here’s what a similar round-robin flow looks like in Complete Leads:
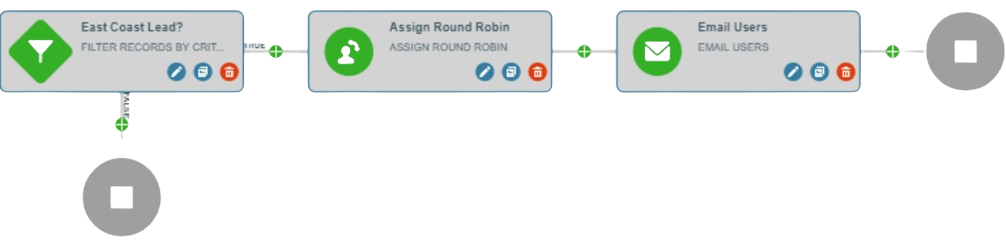
There are only three steps in this example — filtering records by criteria, distributing leads via round robin, and emailing relevant users of their assignment. If you want to add another step in this flow, like logging the assignment in a custom object for reporting purposes, you can just drag and drop the appropriate element or action into it.
You can make these changes without custom APEX coding, Salesforce Admins, or developers — and without waiting weeks to make an update when your rules have already changed again. Complete Leads also includes a hierarchy matching feature that lets you match and route leads to specific company hierarchy levels, making otherwise complex routing a breeze.
Empowering Marketing, Sales Operations, and Revenue Operations Teams
Responding quickly to leads and adjusting your team’s lead routing rules and GTM strategy on the fly is crucial to maximize your conversion rates. If you spend hours assigning leads or wait months for an IT team or Salesforce admin to update assignment rules in Salesforce, it’s time to consider a purpose-built lead routing tool.

Upgrade Your Lead Routing with Traction Complete
If you’ve ever watched a hot lead turn cold because the assigned rep was out of office, or seen a prospect get routed twice to different reps — you know exactly why lead routing needs a revamp.
Complete Leads gives you the control to match leads with precision, build flexible routing logic without code, and keep your follow-up timing tight — no matter how complex your GTM strategy gets.
Book a demo and see how much smoother RevOps can run when handoffs don’t need babysitting.