You can’t maximize your sales potential without a clear, data-driven approach to Salesforce territory management.
Whether you’re expanding into new markets or refining how you allocate accounts, successful territory management depends on reliable data, clear ownership, and processes that scale (without creating more admin work for your team).
This article covers what to do, how to do it, and what to measure, so that you can build territories your sales reps trust.
What is Salesforce Territory Management?
Salesforce territory management helps businesses structure their sales teams around strategic criteria like:
- Geography
- Industry
- Customer Type
- Account characteristics
Done well, it prevents account conflicts, optimizes sales coverage, and ensures targeted and efficient sales efforts.
Ultimately, Salesforce territory management provides better visibility into performance across regions, while helping leaders track progress and make data-driven adjustments to drive revenue growth.
Territory management in Salesforce also helps businesses quickly respond to market shifts and customer demands.
As markets evolve and go-to-market (GTM) strategies shift, companies can redefine territories to ensure they capture new opportunities and sales reps aren’t stretched too thin across lower-value accounts.
Why Territory Management Matters
Despite the benefits of effective territory management, sellers often treat this crucial project as a one-time project.
According to Gartner, more than half of sellers only review account plans once or twice a year.
This lack of attention leads to several challenges that directly impact sales efficiency and performance:
- Outdated territory plans. Territory assignments fall out of sync with market changes and GTM strategy, leading to inefficient coverage and missed opportunities.
- Account conflicts. Poor visibility and outdated assignments create overlapping territories, forcing reps to compete for the same accounts and contend with potential commission splits. Over time, this leads to team friction, reduced productivity, and even rep turnover.
- Unbalanced workloads. Mismanaged territories can stretch reps thin. Some may spend too much time on low-value accounts, leaving high-value ones under-prioritized.
This not only limits revenue potential but also risks burnout, as reps struggle to keep up with overloaded territories and reach sales quotas.
Why is optimizing Salesforce territory management so important? Because your reps live and breathe it every day.
Pro Tip: Prevent Territory Disputes with Account Hierarchies
Account hierarchies do more than just connect related accounts — they clarify ownership, eliminate double commission splits, and keep sales reps focused on closing deals instead of resolving conflicts.
WATCH: 5 Tactics to Avoid Territory Disputes with Account Hierarchies
Done right, territory management streamlines your entire sales process, ensuring clear coverage, fair distribution, and fast updates when changes are needed.
Get it wrong, and you’ll find yourself dealing with the challenges mentioned above – plus missed growth opportunities, reduced market agility, and a demotivated sales force.
So, where do you start?
7 Salesforce Territory Management Best Practices
1. Start with a territory-grade data cleanup
Before diving into territory planning and management, it’s crucial to start with clean data.
Duplicates and inaccuracies in your CRM undermine the accuracy and effectiveness of your territory assignments, while avoiding sales overlaps.
You’ll want to prioritize the fields that your routing and assignment rules rely on, such as:
- Website and domain
- Industry and sub-industry
- Employee count, revenue, total addressable market (TAM)
- Country, state, and region
- Parent account or Global Ultimate Parent
- Account owner and account status (active/inactive)
If these fields aren’t clean, your territories won’t be either.
On average, dirty data costs companies $96 per duplicate.
Here are five steps to include in your data cleanup exercise.
1. Start with Salesforce’s built-in duplicate management. Set up matching rules to identify duplicates based on the fields that matter most for territory assignment, such as:
- Email address
- Phone number
- Company domain
- Account name and location
Then, configure duplicate rules to either surface or block duplicates at record creation. This helps prevent new territory conflicts from being introduced if reps create leads, contacts, or accounts.
2. Run a territory-readiness audit report. Create Salesforce reports that highlight:
- Accounts missing required territory fields
- Records with “unknown” or default values
- Suspected duplicates by domain or name
- Accounts without a clear parent or segment
These reports will highlight where territory logic will fail, before they’re even implemented.
3. Identify and fix rule-breakers. Don’t try to clean everything at once. Start by pulling a sample of 50 to 100 accounts that route incorrectly, sit in the wrong segment, or trigger disputes between sales reps.
These accounts usually reveal problems like bad picklists, inconsistent enrichment, and missing hierarchy logic.
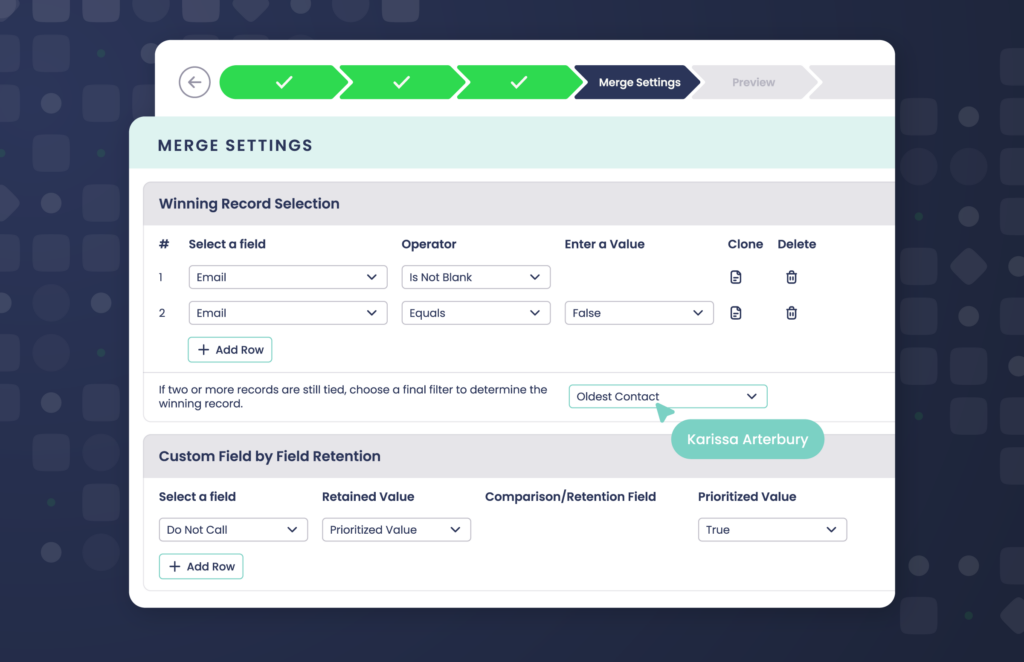
4. Go beyond native tools when you need to scale. Salesforce’s duplicate management tools are a great start, but they often require manual merging and don’t handle custom objects or complex merge logic well.
If you’re dealing with thousands of records, multiple objects, or strict merge rules, third-party deduplication tools like Complete Clean allow you to:
- Mass merge duplicates in bulk, directly inside Salesforce
- Customize survivorship criteria to control which records are kept
- Dedupe any object in Salesforce, including custom objects
- Preview how records will be merged before committing
- Merge duplicates as they enter your CRM
Pro Tip: Supercharge Your Data Cleanup with Complete Clean
Avoid the risks of duplicate data and ensure smooth territory planning by using Complete Clean to mass deduplicate any Salesforce object, including leads, contacts, accounts, and custom objects.
Featuring a no-code, guided interface, Complete Clean lets you quickly identify and merge thousands of duplicates while keeping your data 100% within Salesforce.
And its customizable survivorship and field retention give you full control over which data to keep, ensuring you preserve the most valuable information.
Take the Guided Product Tour
5. Make data cleanup a recurring event. Just like territory management, data hygiene isn’t a one-time project.
The painful (but honest) truth is that Salesforce data doesn’t stay clean for long. And the longer you wait, the harder it is to get things back under control.
Instead of waiting for issues to pile up, establish a monthly or quarterly maintenance routine – with processes like bulk merges or mass deduplications once a quarter.
2. Enrich with firmographics
Territory models only work when the data behind them is consistent, current, and usable.
RevOps teams don’t struggle because they simply lack firmographic data; they struggle because it’s fragmented, inconsistently formatted, outdated, or impossible to apply at scale.
Imagine assigning a mid-market rep to a territory that includes a subsidiary of a large enterprise like Verizon.
If you don’t have the proper firmographic and hierarchy data, you risk assigning the account to the wrong territory, when it should actually belong to the enterprise account rep who owns Verizon. Ultimately, this leads to conflicts between sales reps, territory overlaps, and complications with commission splits.
Firmographic data only helps when it’s standardized, normalized, and up-to-date. If not, it’s just another source of confusion.
Here’s how to enrich fields with firmographic data that optimizes your territory management.
1. Identify the most important fields and define a firmographic profile. When it comes to territory planning, management, and segmentation, some fields will be more important than others.
Common fields to consider include:
- Employee count or revenue range.
- Industry and sub-industry (implement standardized picklists)
- Headquarters country and operating regions
- Parent account and ultimate parent indicators
- Company type (public, private, nonprofit, government)
From there, define a minimum viable firmographic profile – these are the exact fields required for an account to be assigned to a territory.
For example, accounts must have industry, country, and parent accounts populated before territory planning and management.
Not only does this create alignment across RevOps, sales ops, and marketing ops teams – this prevents exceptions from becoming the norm.
2. Standardize and normalize before enriching data. Before adding more data, you need to fix what’s already there.
Here’s an example. Titles like “prod mgr,” “product management,” and “PM” all mean the same thing to a person reading a Salesforce record. But to your Salesforce instance, each of these is a separate value.
Before adding more data, fix what’s already there:
- Collapse free-text values into controlled picklists
- Normalize variations in industry names, regions, and job titles
- Apply consistent formatting to numeric and categorical fields
Native Salesforce tools such as picklists, formula fields, and validation fields can help enforce this structure.
However, when manual standardization and normalization becomes too much, solutions like Complete AI automate this step by interpreting messy or inconsistent inputs. They also convert said fields into standardized values that your territory rules can reliably use.
As a result, instead of relying on brittle validation rules or endless manual cleanup, AI can standardize and normalize data at scale – in real time and inside Salesforce.
Pro Tip: Leverage AI tools that integrate directly into your workflow
RevOps processes such as lead routing, account assignments, territory management, reporting, and enrichment are repetive and rule-heavy. And yet, they’re critical to revenue.
That’s why they’re the best place to start for AI automaton, since small efficiency gains can ripple exponentially across the entire revenue engine.
READ: 5 AI RevOps Automations That Actually Work
3. Choose a source of truth for each field. It’s not uncommon for businesses to leverage multiple enrichment providers.
Tools like Dun & Bradstreet or ZoomInfo automatically pull in critical data — like industry, company size, and hierarchy details — directly into Salesforce. This enriched data gives you the full picture of each account, making it easier to assign accounts to the right territories from the start.
However, with multiple data providers, teams will also need to establish which provider “wins” for each field.
For example:
- Employee count → Provider A
- Industry classification → Provider B
- Domain and Ultimate Parent → Provider C
Without a consistent structure like this, enrichment can introduce conflicts that undermine trust and break territory logic.
4. Establish a cadence for validating enrichment quality. Once a month, review a sample of enriched and normalized accounts.
Here’s what to check for:
- Are industries being categorized correctly?
- Are employee bands landing in the right segments?
- Are hierarchies being inferred accurately?
Implementing light-touch QA can prevent small errors from cascading into system-wide territory issues.
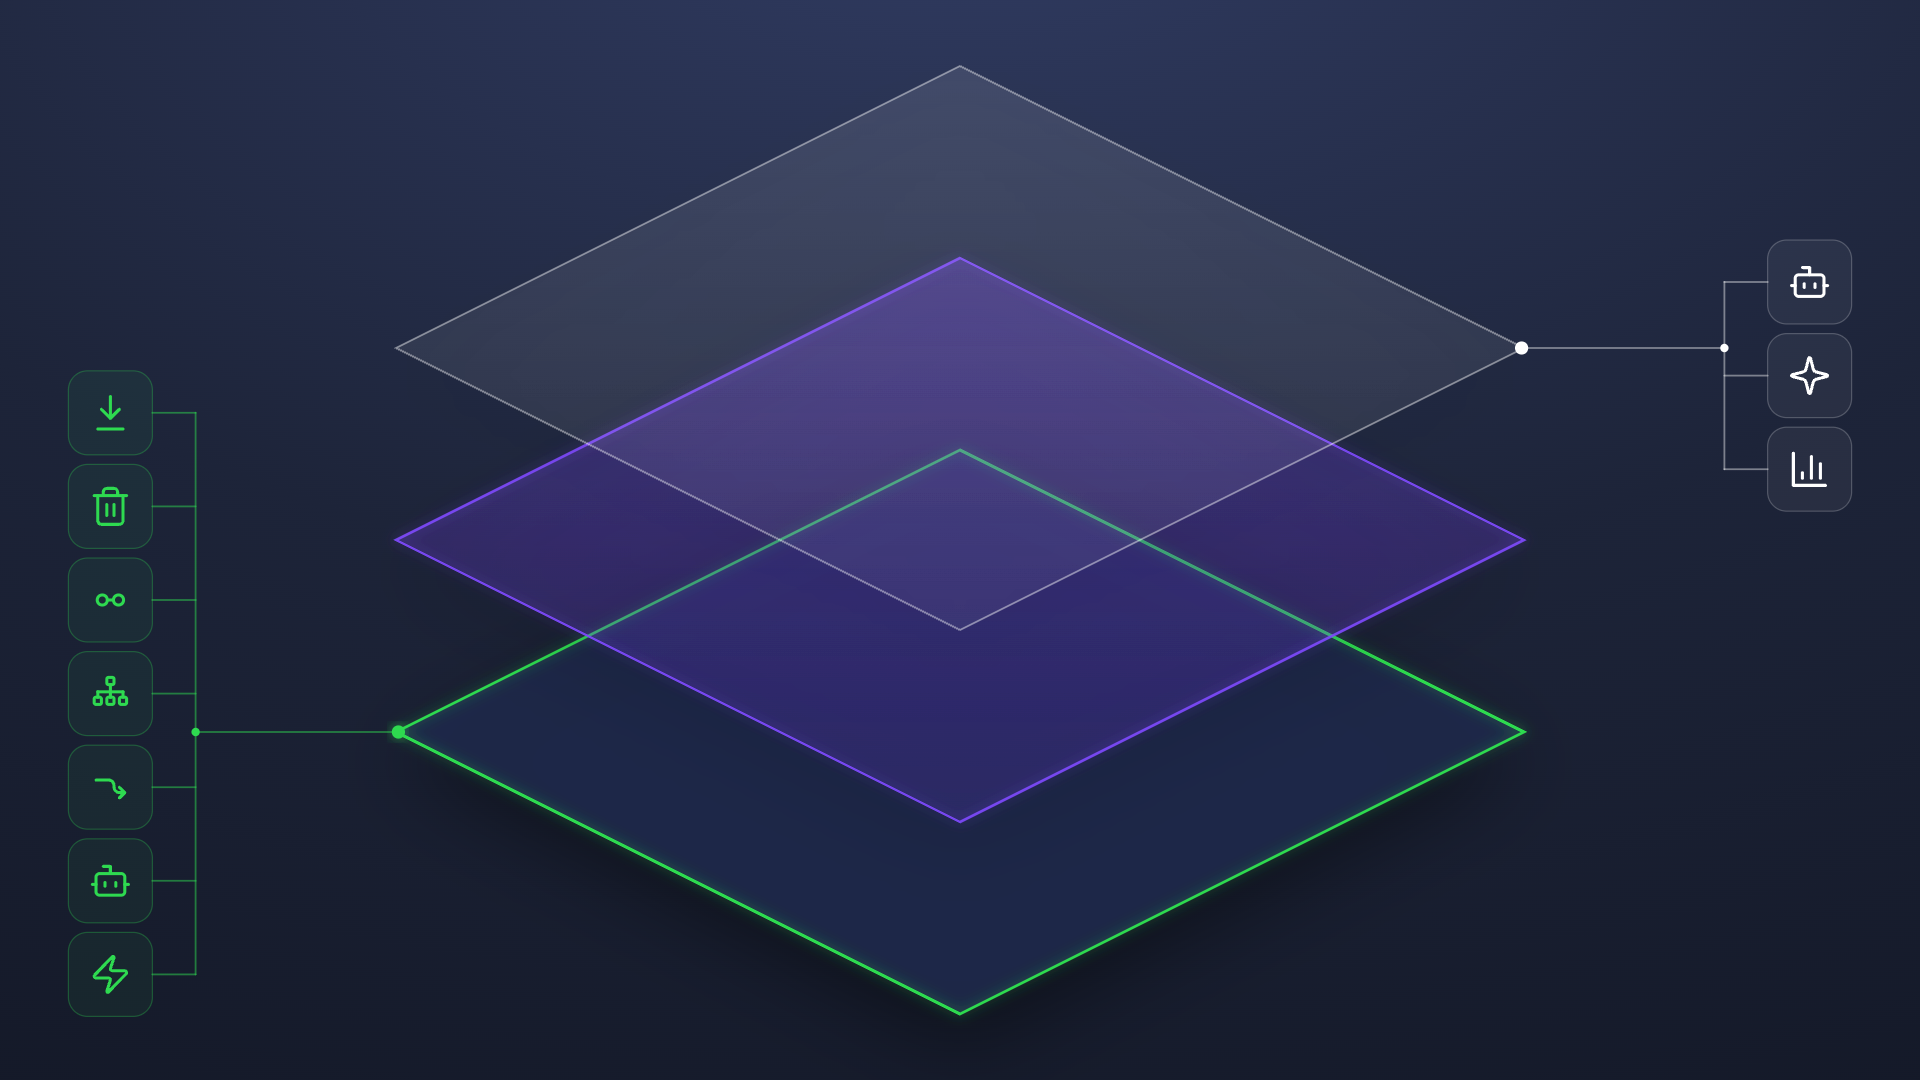
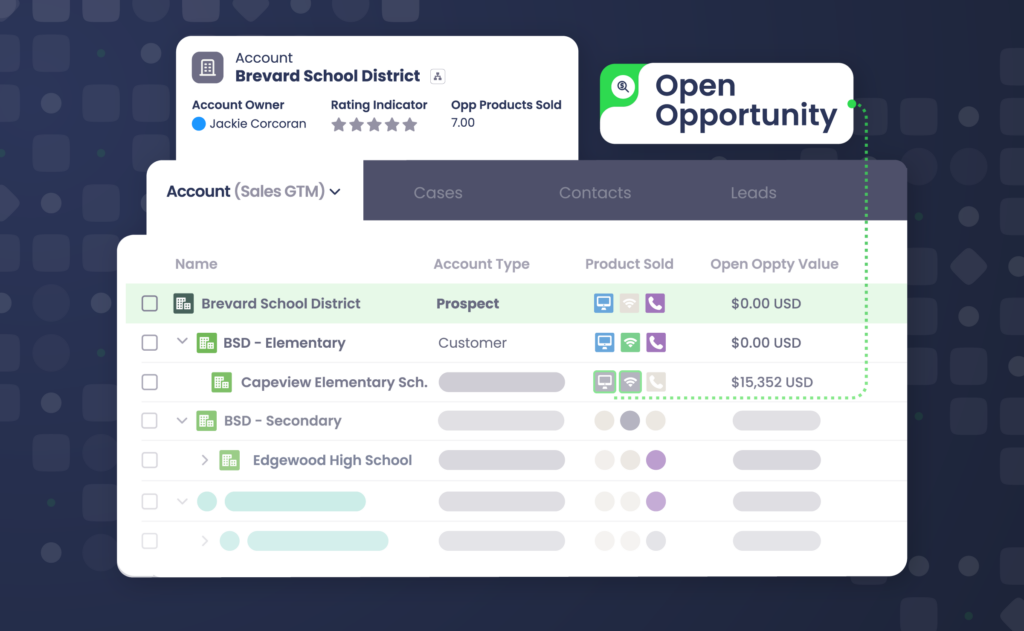
3. Proactively address territory disputes by connecting related accounts
Territory disputes create unnecessary friction within your sales team, especially when related accounts aren’t connected and there’s no clear ownership of related accounts.
When parent companies, subsidiaries, brands, and regional entities aren’t linked, ownership becomes ambiguous. Reps unintentionally work overlapping accounts, customers and prospects get inconsistent outreach, and disputes occur that hurt your bottom line.
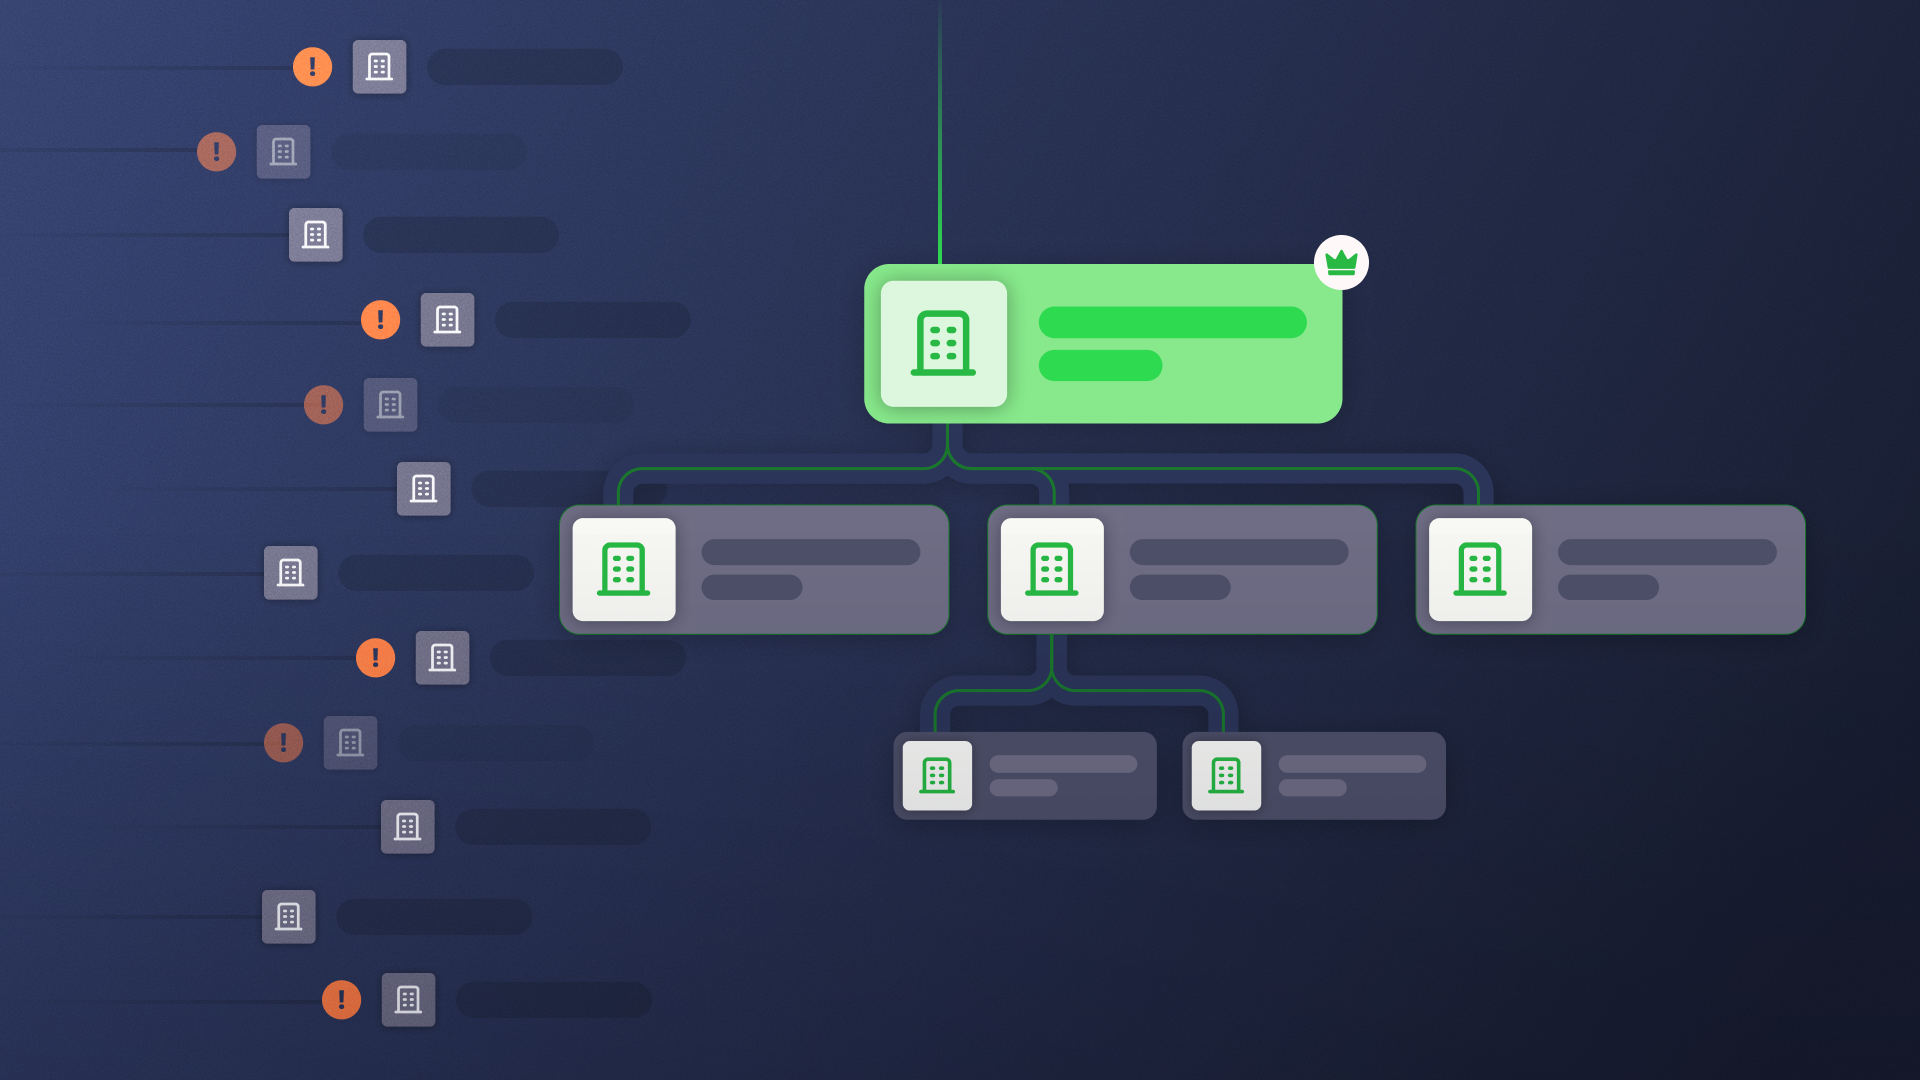
Connecting related accounts using account hierarchy tools is key to avoiding these conflicts.
That’s why in modern GTM motions, account hierarchies are no longer optional – they’re foundational to effective territory management in Salesforce.
Here’s how to implement account hierarchies into your territory management process:
1. Decide how to build and structure your account hierarchies in Salesforce.
Before you build account hierarchies, you should align on how to best structure account hierarchies for your specific go-to-market strategy.
Do you want to build around:
- Legal ownership
- Billing relationships
- Territory alignment
- Product lines
This alignment also helps determine how territories and assignments work, while preventing ownership debates in the future.
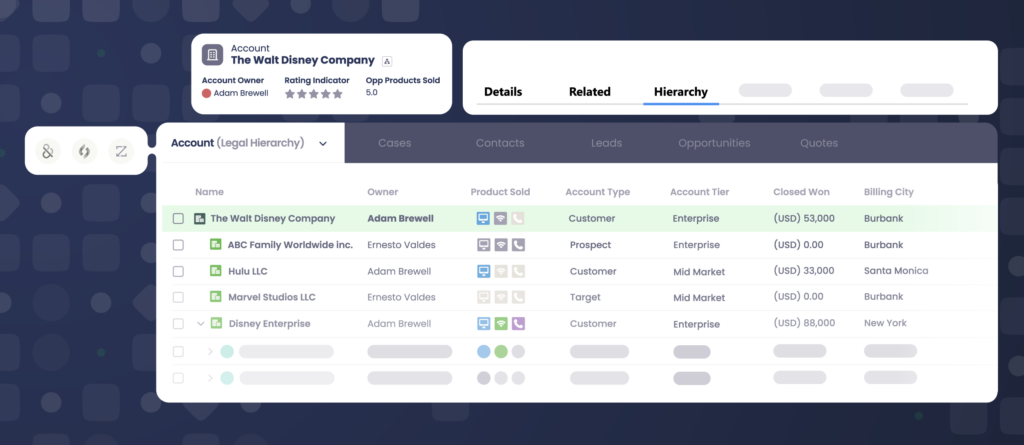
2. Set up account hierarchies in Salesforce.
In Salesforce, account hierarchies are typically built by connecting related accounts through the Parent Account field.
Once you’ve established these relationships, Salesforce’s native user interface (UI) will display a visual tree of accounts that lets you click into each level.
To do this, you can link accounts one by one – identifying which accounts belong to a larger organization and assigning a parent manually.
You can also reduce the manual work by building automation to link related accounts. This typically uses Salesforce Flows or Apex code, with a combination of fuzzy logic, naming conventions, and third-party enrichment data to infer account relationships.
Both of these methods are great starting options but run into problems as your selling complexity scales – but more on this later.
3. Establish ownership rules across the hierarchy. Documenting these rules helps territory decisions stay consistent, even as accounts evolve.
For example:
- Parent account owners will also own all subsidiaries
- Subsidiaries are worked independently but roll up for reporting
- Enterprise parents dictate territory assignment regardless of subsidiary size
4. Make hierarchy data part of your territory logic. Territory assignment rules should also reference hierarchy fields, not just individual account attributes.
Here’s another example:
- If Ultimate Parent Segment = Enterprise → assign to Enterprise territory
- If Parent Account exists → inherit segment unless exception applies
This also prevents subsidiaries from being misrouted into the wrong territory.
5. Automate account hierarchies to hierarchies and territories aligned. Manually building and maintaining account hierarchies doesn’t scale well – especially as companies grow, restructure, or acquire new businesses.
The challenges of manually building account hierarchies include:
- Rigid parent-child structure creating bottlenecks
- Difficulty scaling
- Manual maintenance
- Poor roll-up reporting and revenue insights
- Difficulty maintaining territory alignment
- Native Salesforce only allows for a single hierarchy view at a time
Instead of patching hierarchies together with custom flows or relying on reps, automated solutions give you full control over how you build, visualize, and maintain these relationships inside Salesforce.
Third-party AppExchange solutions such as Complete Hierarchies provide benefits such as multi-hierarchy support, automated data updates, and hierarchy-based lead routing.
4. Redefine and design your territories
To build an effective territory management plan, you need to define key elements that will shape your sales approach. Outlining factors such as market segmentation, customer profiles, and revenue potential ensures your territory strategy targets high-value opportunities and aligns with your business objectives.
Here’s a step-by-step on how to redefine and design your territories:
1. Define your target market. Start by identifying the specific markets you want to focus on. This sets the boundaries for every territory decision that follows.
Common factors include:
- Geography
- Industry
- Company size
- Customer type (SMB, mid-market, enterprise)
Without a clearly defined target market, territory design becomes reactive and inconsistent, leading to challenges down the road.
2. Define your Total Addressable Market (TAM). Next, quantity the total size of the opportunity within your target market.
TAM represents the full revenue potential available to you and helps answer:
- Where should we invest more coverage?
- Where are we over- or under-allocating reps?
- Which segments justify dedicated territoriees?
A clear TAM prevents both over-coverage (wasted effort) and under-coverage (missed growth).
3. Refine your Ideal Customer Profile (ICP). Your ICP helps narrow TAM into the accounts that are most likely to convert and deliver long-term value.
Refining your ICP allows you to:
- Prioritize high-value accounts
- Design territories around quality, not just volume
- Focus reps on opportunities that best align with your GTM strategy
This step ensures territory assignments reinforce your revenue strategy instead of diluting it.
4. Define and model tiers or segments. A strong tiering model is the backbone of scalable territory design.
Once ICP is clear, structure territories around logical tiers such as enterprise, mid-market, and SMB.
Segmenting this way:
- Matches account complexity to rep expertise
- Creates more balanced workloads
- Reduces cherry-picking
- Improves forecasting accuracy
5. Account for account hierarchies. Before finalizing territory assignments, factor in how companies are structured.
Parent companies, subsidiaries, and related entities should be considered together so:
- Ownership is clear
- Coverage is consistent
- Reps aren’t competing across related accounts
Ignoring account hierarchies almost guarantees territory disputes down the road.
6. Define geographic segments. Geography is also an important factor – especially for global or regionally complex GTM motions.
This type of segmentation helps align sales reps with markets they understand and simplifies regional forecasting and management.
Common geographic structures include:
- NA, EMEA, APAC, LATAM
- Country-based or state-based regions
- Metro or named-account regions
7. Align territories with product groups or business units. If your organization sells multiple products or operates across business units, territories should reflect that structure.
Aligning territories to product lines:
- Ensures reps have deep product knowledge
- Reduces context switching
- Improves win rates in complex sales cycles
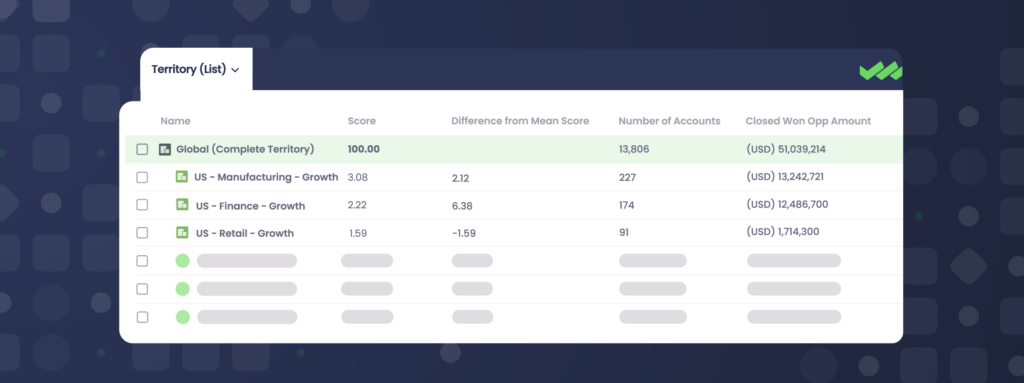
9. Analyze and quantify whitespace. Finally, identify and measure whitespace – untapped opportunities within your defined territories.
Whitespace analysis allows you to:
- Uncover growth pockets
- Rebalance coverage
- Justify new headcount
- Refine territory boundaries
Quantifying whitespace ensures your territory model supports future growth – not just today’s pipeline.
Complete Hierarchies allows our sales team to identify whitespace and partner with account executives across the globe to sell our platform to its fullest extent.
Heidi D. Manager of Sales Operations & Global Data, Zoom
5. Score, grade, and balance your accounts
A critical step in effective territory management is ensuring that your accounts are scored, graded, and balanced across your sales team.
By assigning value to accounts based on factors like potential revenue, strategic fit, and industry, you create a data-driven system that ensures the right reps are handling the right accounts.
Scoring accounts
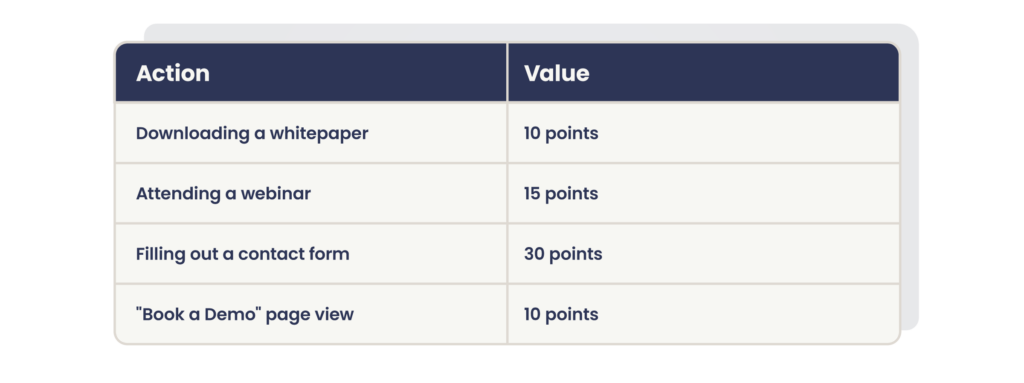
In Salesforce, you can score leads and accounts by defining criteria that indicate their readiness to buy. These might include behavioral actions like downloading a guide, attending a webinar, and scrolling through your pricing page but can also include factors such as company size, a lead’s job title, and their geographic location.
In an account-scoring system, each action and criterion earns a specific point value, reflecting the account’s overall quality and potential for conversion. Accounts with higher scores are prioritized and quickly routed to sales teams, ensuring they receive immediate attention.
Here’s how a SaaS company might define key actions for its account-scoring process:
To maximize effectiveness, integrate Total Addressable Market (TAM) and Serviceable Available Market (SAM) into your scoring system.
TAM represents the entire market opportunity, while SAM focuses on the segments that your company can realistically serve based on your current resources and go-to-market strategy.
For example, accounts within your SAM might earn higher scores because they represent the most realistic, high-potential opportunities. Accounts within your TAM but outside your SAM might score lower since they’re less likely to convert in the short term.
You can prioritize high-scoring accounts and quickly route them to sales teams to ensure they receive immediate attention. This strategy helps you focus on accounts with high potential that align with your immediate SAM, making your sales efforts more targeted and strategic.
Grading accounts
Scoring lets you rank accounts based on their actions and potential, but grading takes it a step further by categorizing them into tiers that align with your GTM strategy and sales team.
Grading lets you segment accounts by their overall quality and fit with your business, helping reps focus on the right opportunities with the appropriate level of effort and resources.
When you grade accounts, you typically categorize them into A, B, and C tiers, and then refine them further using TAM and SAM insights:
- A-grade accounts represent your highest-priority opportunities, typically drawn from your SAM. These are enterprise-level accounts that closely match your ICP or accounts expected to bring the highest revenue or strategic value to your company. Your most experienced sales reps, who are equipped to manage complex deals and relationships, often handle these accounts.
- B-grade accounts are mid-tier accounts, often mid-market companies and businesses that fall within your TAM but might not be immediate fits for your SAM. These accounts might not have the same immediate revenue potential as A-grade accounts but still offer solid opportunities for growth and expansion. You’ll typically assign these to reps with moderate experience.
- C-grade accounts are smaller and lower-priority accounts typically representing SMBs and businesses with lower-value deals that might be within your TAM but aren’t part of your SAM. These accounts are still important but don’t require the same level of attention as A or B accounts. Junior reps may handle these accounts and you can often manage them at scale using automated outreach and sales tactics.
Pro Tip: Automate Territory Assignments with Formula Fields
Don’t waste time manually assigning accounts to territories.
With Complete Hierarchies, you can create formula-based matching rules that dynamically evaluate fields like region and industry. This ensures child accounts inherit the right territory from their parent, keeping assignments accurate and aligned with your territory model.
Balancing accounts
After you score and grade your accounts, the next step is making sure they’re balanced fairly across your sales team. Balancing ensures that each rep has a manageable and fair share of high-value accounts, preventing any one territory from being overloaded with too many high-priority accounts while others are underutilized.
To ensure fair account distribution and optimal sales performance, follow these five steps:
- Review account distribution. Begin by reviewing how you distribute A, B, and C-tier accounts across your territories. Ensure each rep manages a mix of accounts that aligns with their experience and the complexity of the accounts.
- Identify imbalances. Look for any signs of imbalance. For example, a rep with mostly A-grade enterprise accounts might have too much workload compared to another rep handling mostly C-grade SMB accounts. Identify where accounts are unevenly distributed.
- Reassign accounts for balance. Reassign accounts where needed. If one rep has too many high-priority accounts, move some A-grade accounts to a rep with fewer high-value opportunities. This ensures each territory has a balanced workload.
- Match accounts to rep capacity. Assign accounts based on each rep’s capacity and expertise. Give more complex, high-value accounts to experienced reps, while assigning a higher volume of smaller accounts to junior reps or teams that can manage them at scale.
- Continuously monitor and adjust. Balancing accounts is an ongoing process. As new accounts are added and existing ones change, regularly review and adjust the account distribution to ensure that reps are neither overwhelmed nor underutilized.
Pro Tip: Balance Territories with a Marketplace Approach
A territory account marketplace lets sales teams “buy” or “sell” accounts based on value and fit, ensuring balanced workloads and optimized coverage.
WATCH: Buying & Selling Accounts – A New Territory Marketplace Model
6. Automate territory reassignment and execution
As market conditions evolve and team structures change, territory assignment needs to happen quickly – without breaking workflows or slowing reps down.
When territories lag behind reality, reps end up working outdated account lists, coverage gaps appear, and RevOps gets pulled into reactive cleanup instead of strategic work.
Unfortunately, using out-of-the-box Salesforce for manual territory reassignment introduces serious friction:
- Complex rules management. Manually updating territories requires navigating through a maze of assignment rules and flows. If you have complex territories, this means sifting through layers of criteria. As your organization scales and your team expands, your rules only grow more intricate, which makes keeping everything in sync incredibly challenging.
- Record-by-record updates. In Salesforce, you can only update accounts and opportunities one record at a time. This manual process doesn’t scale well, especially if you have thousands or even just hundreds of accounts. It’s easy to miss records, risking incomplete or inconsistent territory coverage.
- High risk of human error. Manually reassigning territories increases the chances of mistakes. A missed update or incorrectly applied risks assigning accounts to the wrong rep, creating confusion, reducing productivity, and leading to potential revenue loss.
- Slows down agility and responsiveness. Markets move fast and you need to realign territories quickly to capitalize on new opportunities. Manual processes are too slow to keep pace, which puts you at a competitive disadvantage.
Modern territory management isn’t one-size-fits-all. Different changes require different execution models – and the most effective RevOps teams use the right tool for the job.
Third-party solutions like Traction Complete offer two different approaches to automating territory reassignment and execution in Salesforce.
Assignment tables (best for changing territory logic)
Assignment tables are critical for when territory rules need to change, not just ownership.
They give RevOps teams a structured, repeatable way to manage assignment logic without rewriting flows or untangling brittle automation.
Instead of spreading logic across Salesforce rules, flows, and exceptions, assignment tables centralize it in a format RevOps teams already understand.
1. Use a spreadsheet as your source of truth. Start by defining all territory rules in a single spreadsheet.
At a minimum, it should include:
- Segment or territory name (i.e., Enterprise NA, Mid-Market EMEA)
- Assigned user or user group (who owns this segment)
- Geographic criteria (country, state/province, city, postal or zip code)
- Additional filters (industry, employee size, revenue, etc.)
This approach makes territory logic explicit, reviewable, and easy to validate with Sales and leadership before anything touches Salesforce.
2. Upload and map the spreadsheet into Traction Complete.
Once the spreadsheet is finalized, upload it into Traction Complete.
During this step:
- Map each spreadsheet column to the appropriate field
- Confirm data types and expected values
- Validate that rows reflect the intended assignment logic
This mapping step ensures your territory logic is interpreted correctly and consistently.
3. Automate territory execution using assignment tables. With assignment tables in place, flows in Traction Complete can reference them to assign accounts, leads, contacts, opportunities, and other standard objects.
This strategy also helps declutter structures inside the user’s routing flow.
4. Stay flexible as territories evolve.
Remember, territories are never static – but assignment tables support change without disruption.
When updates are needed:
- Add or modify rows in the table
- Update assignments without restructuring automation
- Ensure ownership changes apply consistently across related records
This is especially useful during territory realignments, new segment launches, GTM strategy shifts, and M&A-driven changes.
Pro Tip: Close the gap with assignment tables to ensure territory execution
Most companies spend months building territory plans, but executing them in Salesforce is where things fall apart. Accounts sit unassigned, handoffs lag, and reassignments get messy.
WATCH: The last mile of GTM strategy: Territory execution
Territory ID-based reassignment (best for ownership changes at scale)
Territory ID reassignment comes into play when territory logic stays the same but ownership needs to change fast.
Think rep departures, new hires, re-orgs, backfills, or even just reps being away on vacation.
This is especially useful when you need to reassign multiple related records at once, not just accounts.
Here’s how to implement reassignment using a Complete Territory ID.
1. Ensure every account is tagged with a Complete Territory ID. First, ensure accounts have a consistent identifier that represents the territory they belong to.
This creates a stable grouping mechanism that doesn’t change every time an owner changes.
2. Group accounts by Territory ID (instead of rep name). Territory IDs function by updating a territory group, not individual records.
This also helps territories stay consistent, as well as allowing for owners to change without breaking a model.
3. Use Complete Hierarchies to pull the full territory “package” into one view. Instead of updating records across multiple screens, you can view all related records tied to that Territory ID in one place.
Think leads, opportunities, accounts, contacts, and other relevant objects.
4. Update ownership once and cascade changes automatically.
Now, when a sales rep joins, leaves, or coverage shifts:
- Update the owner for that Territory ID group
- Cascade ownership updates across all associated records
- Apply changes in bulk (instead of record-by-record)

Cisco’s challenges with territory reassignment and how Traction Complete helped
Cisco, a global leader in IT and networking, faced these exact same challenges with its manual territory management system.
With a complex territory model that grouped accounts based on industry, geography, and other criteria, Cisco’s Sales Ops team had to manually update territory ownership whenever a sales rep joined or left the company. This involved extensive data loads and record updates, a process that was not only time-consuming but also error-prone.
Given the large volume of accounts and the constant changes within the sales organization, maintaining accurate territory assignments slowed down sales operations, increased misassignment risk, and made it difficult for Cisco to keep pace with its dynamic sales environment.
Traction Complete transformed Cisco’s managed management system by helping it automate mass territory reassignment.
With Complete Hierarchies, Cisco can group accounts based on territory ID and display all related records in a single view. This setup linked every account, along with its related records — such as opportunities, leads, and contacts — under a unified structure.
How Cisco Achieved 150% Greater Lead and Account Assignment Accuracy
Cisco streamlined lead routing and territory management with Traction Complete, eliminating misassignments and improving speed-to-lead.
Learn How
Now, whenever a rep leaves or joins the organization, Cisco can simply update the ownership field for a specific territory and automatically cascade the changes down to all associated records. This also enabled Cisco to mass update Salesforce records and perform bulk updates, allowing the team to reassign ownership across multiple territories simultaneously.
7. Track performance over time
You can’t improve what you don’t measure, so tracking the right metrics is crucial to truly optimizing your Salesforce territory management.
By monitoring key performance indicators like total revenue by territory, account win rates, and rep productivity, you equip your Sales Ops team with the data needed to replicate what’s working and fix what isn’t.
Additional metrics to keep an eye on include:
- Total revenue generated. Tracking overall revenue lets you know which areas deliver the most value and which need adjustments or additional resources.
- The number of accounts closed by each rep. This shows rep productivity within each territory and helps identify high performers, as well as those who may need support or territory adjustments.
- Closed-won revenue by territory. Instead of just focusing on the number of accounts closed, this metric tracks the total revenue generated from deals won in each territory to show you the quality and value of closed deals — not just the quantity.
- Sales across the corporate family tree versus individual accounts. Monitoring performance within a corporate family tree shows you how well reps penetrate related accounts. This metric uncovers opportunities for cross-selling and upselling, ensuring reps are maximizing every opportunity within larger account structures.
- Sales cycle length by territory. Tracks how quickly deals close within each territory. This lets you identify territories where the sales process may need optimization.
- Territory pipeline value. Reveals the future revenue potential of each territory, giving you insight into which areas are on track to meet or exceed targets.
Pro Tip: Unlock Deeper Insights with Roll-up Reporting
Tracking performance across related accounts is nigh impossible when you have siloed data.
Skip the spreadsheets — use Complete Hierarchies’ Rollup Anything feature to consolidate key metrics across parent-child accounts, helping you spot trends, measure performance at different levels, and identify new growth opportunities.
WATCH: Live Demo – Roll-Up Reporting in Complete Hierarchies
Make sure your sales and customer success teams make it a habit to document all of their customer and prospect activities in your CRM. This makes account handoffs seamless and leaves a paper trail to dig into account insights that can support your measures of success.
Improve Your Salesforce Territory Management Without Breaking a Sweat with Traction Complete
The last thing you want is to have your sales reps operating at anything less than their fullest potential or leaving revenue on the table. Optimizing your territory planning will positively impact your team’s day-to-day selling motion and long-term performance.
Ready to elevate your territory management? See how Traction Complete can help your team maximize efficiency, reduce conflicts, and uncover new opportunities — all without the manual hassle. Book a demo today and experience the difference firsthand.