Throughout the year, territory changes and account adjustments pile up, with teams reassigning territories whenever a rep joins or leaves, or when go-to-market (GTM) shifts demand immediate adjustments.
Whatever the reason, keeping your territories accurate and updated is key for maintaining sales momentum.
But if you’re stuck reassigning territories through spreadsheets and waiting for the IT team or a Salesforce Admin to do bulk updates, the process can quickly become a bottleneck and hinder your sales team’s ability to perform at their best.
To keep your team focused on what they do best — driving sales — you need quick, bulk updates and effortless territory reassignments.
How to Mass Update Records in Salesforce Using Data Loader
Data Loader, a client application provided by Salesforce, lets you interact with your Salesforce data directly from your computer.
Here’s how to perform mass updates in Salesforce using Data Loader:
- Get your data. Start by exporting the data you want to update. You can do this by exporting the relevant objects in Salesforce or by running a report. Make sure your export or report includes the record ID for each record since this will be crucial later on.
- Backup your data. Before making any changes, save an extra copy of the generated CSV files as a backup. This lets you revert any changes if something goes wrong during the update.
- Edit your data. Open the CSV file in a spreadsheet editor, like Excel or Google Sheets, and make the necessary changes. Ensure you modify only the Salesforce fields you intend to update while keeping the record IDs intact.
- Launch Data Loader. After updating your data, launch Data Loader and go through the wizard.
- Review success and error logs. After the update finishes, Data Loader generates log files detailing which records it successfully updated and which encountered errors. Be sure to review these logs carefully to ensure all intended updates are correct.
- Revert changes if necessary. If you made any mistakes or if the update didn’t go as planned, you can use your backup CSV file to revert the records to their previous values based on the record IDs you recorded earlier. Just repeat the process from step 1 while using the original data from the backup file.
Challenges of Using Data Loader
Data Loader is a powerful tool, but it has downsides worth considering:
- Complex User Interface (UI). Data Loader has a technical interface with a steep learning curve. Users unfamiliar with handling CSV files, managing records, or using the Data Loader wizard can find it challenging to use. For complex or larger-scale data updates, you’ll likely need help from a Salesforce Admin or an IT team.
- No native scheduling or automation. Data Loader doesn’t offer native scheduling for regular data loads. This means you have to run nightly updates to customer records, weekly territory realignments, and monthly data cleanups manually, which introduces human error and inconsistency.
- Risk of human error. Data Loader operates on bulk data, so even small mistakes in your CSV, like incorrect data entry or mismatched record IDs, risk creating Salesforce record errors.
- Slows down performance. Running large data loads, especially during peak business hours, negatively impacts Salesforce performance. Bulk operations can slow down your Salesforce instance and affect the experience of other users.
- Limited error resolution. Data Loader doesn’t offer real-time error notifications. If an error occurs, you won’t notice it until after Data Loader completes its operation. And if something goes wrong, you’ll have to manually review logs to identify and fix the problem.
How to Mass Update Records in Salesforce Without Data Loader: 3 Steps
Given its limitations, relying on Data Loader isn’t always the best solution. Its complex interface, lack of automation, and potential for errors can all disrupt your sales flow.
Instead of grappling with these challenges and spending hours or weeks on data chores, you can embrace automation to expedite the process.
Here’s how you can skip the spreadsheets and data loads, and instead, visualize, balance, and manage territory ownership right inside Salesforce with Traction Complete.
1. Define and refine your territories
Effective Salesforce territory management begins with a clear definition of your territories.
Whether you’re combining, splitting, or creating new territories, start by analyzing your current setup and identifying key data points for regrouping, such as:
- Target Market
- Total Addressable Market (TAM)
- Ideal Customer Profile (ICP)
- Tier (Enterprise, Mid-Market, SMB)
- Hierarchy data
- Industries
- Products
- Scoring
Beyond identifying these data points, determine which metrics are crucial for your business to carve out balanced territories.
Common metrics to consider in your territory planning and reporting include:
- Annual Recurring Revenue (ARR)
- Amount of open opportunities
- Amount of accounts
- Amount of leads
- Opportunity win rate
Defining your territories against these key metrics helps you align your go-to-market (GTM) strategy with your goals and allocate resources more effectively.
Balanced territories lead to more efficient coverage, reduced account conflicts, and improved sales performance.
2. Automate with territory objects
After redefining your territories based on your GTM strategy, it’s time to reassign them.
You might use Data Loader for this step, but you can automate mass territory reassignment with territory objects to make your life easier.
Custom territory objects make it easy to reassign records and perform bulk updates without exporting or importing large data sets.
A territory object serves as a centralized list of accounts you can automate, capturing and connecting relevant account data and related accounts in one place. This setup lets you make more informed decisions when balancing territories and automating ownership rules.
Here’s how to automate using territory objects:
- Stamp territory identifiers. Start by stamping a territory identifier on all the accounts you plan to split. These might look like “US – Midwest – Major,” “US – Pacific – Minor,” or “US – Atlantic – SME.”
- Establish automation for missing IDs. If you don’t have a territory ID, set up automation to crawl through and stamp a unique identifier based on existing ownership. Note that this may slow down your processes and could require custom APEX flows and IT intervention.
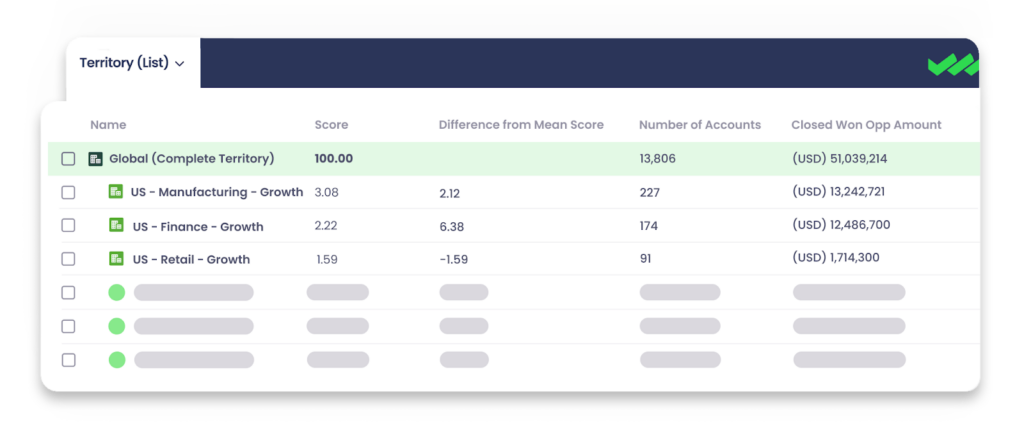
- Leverage Complete Hierarchies. Use a territory object record in Complete Hierarchies to automatically reassign territories and related objects.
Customizable rules in Complete Hierarchies give you the flexibility to tailor assignment actions on a larger scale or a record-by-record basis.
For example, you can choose to cascade ownership changes downward to include all child records or limit them to a select few. You can also set conditions based on specific criteria, such as account size or industry, aligning each territory with your overall strategy.
This approach has transformed how companies — like Cisco — manage territory ownership.
With Complete Hierarchies, Cisco now groups accounts based on territory ID and displays all related records in a single view. It can also link all of its accounts and associated Salesforce records, such as opportunities, leads, and contacts, under a unified structure. This lets Cisco update the ownership field for a specific territory and automatically cascade the changes down to all associated records whenever a rep leaves or joins the organization.
3. Enable your GTM team
Reassigning territories only works if your team is equipped to execute. Start by providing upfront visibility to build trust, reduce misunderstandings, and prevent unnecessary account conflicts.
Here’s how to do it:
- Plan ahead. Have reps complete a territory exercise at the start of the year to plan their account strategy. This preparation helps reps maintain their momentum if and when they have to take over a territory or accounts mid-year.
- Make key information easily accessible. Ensure new sales reps can quickly access all relevant details about a territory, including associated accounts and key contacts. Knowing who their champion is within each account lets reps engage more effectively.
- Map buying groups. Track each stakeholder’s role, advocacy, and influence levels to help reps focus their efforts on the people who can help them close deals.
- Provide context. Quickly update leaders and other teams with the information they need to support deals so every 1:1 coaching session, QBR, and ABM play is successful.
Most importantly, centralize data within Salesforce to eliminate issues with siloed sales notes and empty fields. Although collaborative tools like Quip can be helpful, relying on them alone risks leaving important details on the table, especially as reps join and leave the team.
Pro Tip: Use Relationship and Influence Mapping Tools Like Complete Influence to Improve Sales Processes and Visibility.
Mid-market and enterprise companies have complex networks of employees, decision-makers, and relationships. To close deals effectively, your sales team must understand who advocates for your brand and product, and who might be favoring another solution.
By using these relationship mapping tools, you can monitor how strong a relationship is and the level of decision influence a person has in a deal. This lets sales reps pinpoint crucial individuals in the buying cycle, ensuring they focus their efforts on the right people.
Automating Salesforce Mass Record Updates with Traction Complete
Bulk updating Salesforce records takes time and slows you down. When reassigning territories quickly you want to empower your go-to-market team to stay nimble, close more deals, and effectively start selling faster.
To learn more about bulk updates or mass transfer options for territory assignment, book a demo with the Traction Complete team or download our free guide. We look forward to hearing from you!